1
/
of
4
Uploader
Hino Truck 2011, 2012 and 2013 Service Manual Workshop Guide
Hino Truck 2011, 2012 and 2013 Service Manual Workshop Guide
Regular price
$36.00 USD
Regular price
Sale price
$36.00 USD
Unit price
/
per
Taxes included.
Shipping calculated at checkout.
Couldn't load pickup availability
HINO 238, 258LP, 268, 338, 358
Format: PDF
Language: English
Hino 2011, 2012 and 2013 Truck Manual for 238, 258LP, 268, 338, 358 – 1097 Pages
Hino 2011, 2012 and 2013 ECU and BCU Manual – 926 Pages
Hino J08E-VB and J08E-VC Engine Manual – 329 Pages
Description
Hino Truck 2011, 2012 and 2013 Series: 238, 258LP, 268, 338, 358 Service Manual
This is the Repair and Service Manual for
Hino Truck
2011, 2012 and 2013
HINO 238, 258LP, 268, 338, 358
Format: PDF
Language: English
Hino 2011, 2012 and 2013 Truck Manual for 238, 258LP, 268, 338, 358 – 1097 Pages
Hino 2011, 2012 and 2013 ECU and BCU Manual – 926 Pages
Hino J08E-VB and J08E-VC Engine Manual – 329 Pages
This workshop manual has been prepared to provide information covering repairs on 238, 258LP, 268, 338, 358 series Hino 2011, 2012 and 2013 trucks.
To use Hino 2011, 2012 and 2013 trucks for years, smoothly, safely, and economically without trouble, it is important to perform inspections.
Maintenance required to be performed is the responsibility of the owner. Some recommended repairs of your truck are mentioned. When making any repair of your truck, be careful not to be injured through improper procedures.
As for maintenance items, refer to the Owners and Drivers Manual. All information and specifications in this manual are based upon the latest product information available at the time of printing.
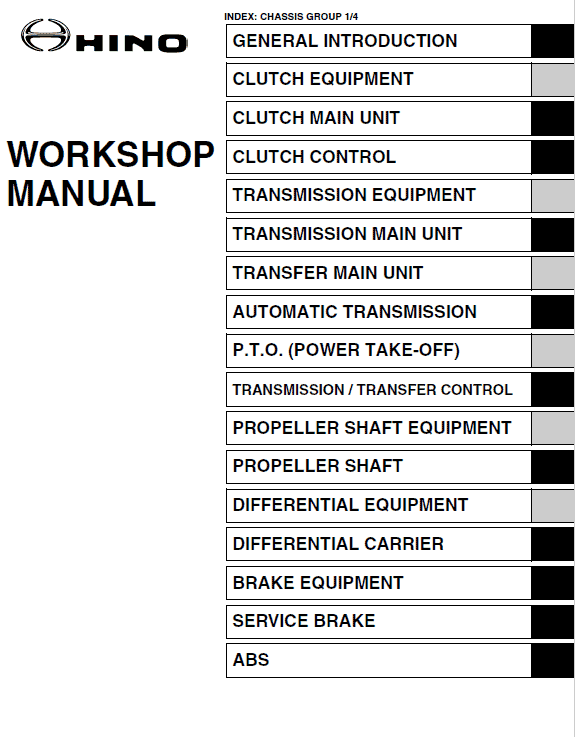
Table of Content For Hino 2011, 2012 and 2013 Truck Manual:
General Introduction
Clutch Equipment
Clutch Main Unit
Clutch Control
Transmission Equipment
Transmission Main Unit
Transfer Main Unit
Automatic Transmission
P.t.o. (Power Take-off)
Transmission / Transfer Control
Propeller Shaft
Differential Equipment
Differential Carrier
Propeller Shaft Equipment
Brake Equipment
Service Brake
Abs & Asr
Es Start (Easy & Smooth Start) System
Exhaust Brake
Retarder Brake
Parking Brake
Steering Equipment
Steering Unit
Power Steering
Axle Equipment
Front Axle
Rear Axle
Wheel & Tire
Suspension Equipment
Suspension
Chassis Equipment
Chassis Frame
Coupler (5th Wheel)
Pintle Hook
Engine Control
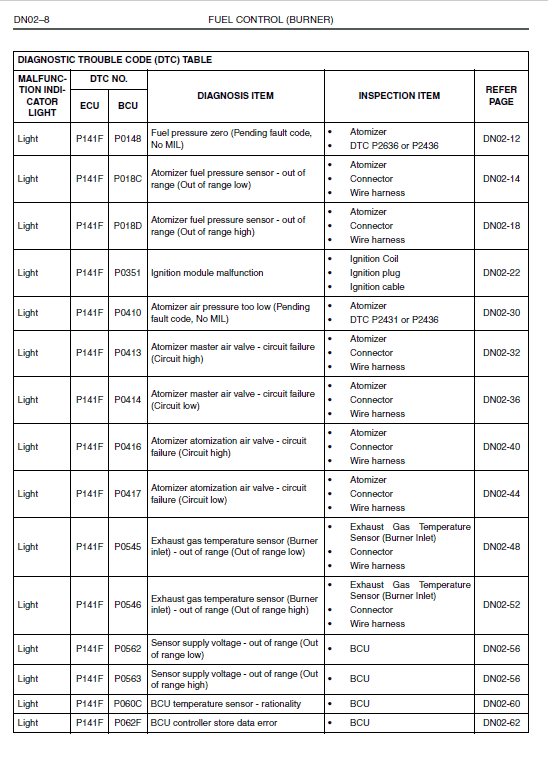
Fuel Control
Brake Control
Suspension Control
CAB Equipment Control
Others
Hino Truck 2011, 2012, 2013 Manual Instruction Extract:
3. BRAKE PADS
(1) Inspect the rotor for scoring, warping, cracks, bluing, heat spots or other damage or defects and minimum thickness. Repair or replace if necessary.
(2) Inspect the disc brake calipers for leakage, damage or defects to piston boots, seals or pistons. Replace or repair the parts as required.
(3) Clean and inspect the lining rail covers. If they are worn, they must be replaced.
NOTICE
The inboard and outboard brake pads are identical, except when they are equipped with a mechanical wear sensor.
(4) Install the brake pads. Ensure that the friction surface is against the rotor. Install the pad retainer spring and tighten the bolt to 30 lb-ft (40 Nm) of torque.
NOTICE
Brake pad clearance adjustment is automatic.
(5) Fill the master cylinder reservoir with new, clean, high-performance DOT 3 brake fluid or equivalent. Make several brake applications to move the brake pistons and linings out into contact with the brake rotors.
(6) Recheck master cylinder reservoir and top off as necessary to manufacturer's recommended level.
(7) Bleed the brake system.
(8) Install the tire and wheel assembly according to the manufacturer's instructions.
(9) Lower the vehicle and road test for correct operation.
4. ASSEMBLE THE SUPPORT
(1) Install the support mounting bolts. Tighten the bolts to the specified torque. Refer to Section 8.
(2) Install the ABS sensor. Tighten the bolt to 8 lb-ft (11 Nm).
(3) Install the hub and rotor assembly according to vehicle manufacturer's recommended service procedure.
(4) Install the splash shield, if equipped.
(5) Install the caliper as described in Caliper in this section.
Share