1
/
of
4
Uploader
Hino Truck FA4J, FB4J Year 2003 Repair Manual (FA, FB) Workshop Guide
Hino Truck FA4J, FB4J Year 2003 Repair Manual (FA, FB) Workshop Guide
Regular price
$36.00 USD
Regular price
Sale price
$36.00 USD
Unit price
/
per
Taxes included.
Shipping calculated at checkout.
Couldn't load pickup availability
This is the Repair and Service Manual for
Hino Truck
2003
Series: FA, FB
Format: PDF
Language: English
Hino 2003 Truck FA and FB Series Manual – 1104 Pages
Hino Truck 2003 Owners Manual – 330
Description
Hino Truck FA4J, FB4J Year 2003 Repair Manual (FA, FB)
This is the Repair and Service Manual for
Hino Truck
2003
Series: FA, FB
Format: PDF
Language: English
Hino 2003 Truck FA and FB Series Manual – 1104 Pages
Hino Truck 2003 Owners Manual – 330
This workshop manual has been prepared to provide information covering repairs on FA, FB series Hino 2003 trucks.
To use Hino 2003 trucks for years, smoothly, safely, and economically without trouble, it is important to perform inspections.
Maintenance required to be performed is the responsibility of the owner. Some recommended repairs of your truck are mentioned. When making any repair of your truck, be careful not to be injured through improper procedures.
As for maintenance items, refer to the Owners and Drivers Manual. All information and specifications in this manual are based upon the latest product information available at the time of printing.
Table of Content For Hino 2003 Truck Manual:
General Introduction
Engine
Clutch
Clutch Control
Transmission
Transmission Control
Propeller Shaft
Rear Axle
Front Axle
Steering
Service Brake
Parking Brake
Exhaust Brake
Wheels & Tires
Suspension
Chassis Frame
Cab
Electrical Equipment
Alternator
Starter
Compressor
Turbocharger
Spring Brake
Power Steering
Automatic Transmission
Antilock Brake System
Total Electronics System
Service Specification
Electrical Wiring Diagrams
Hino Truck 2003 Manual Instruction Extract:
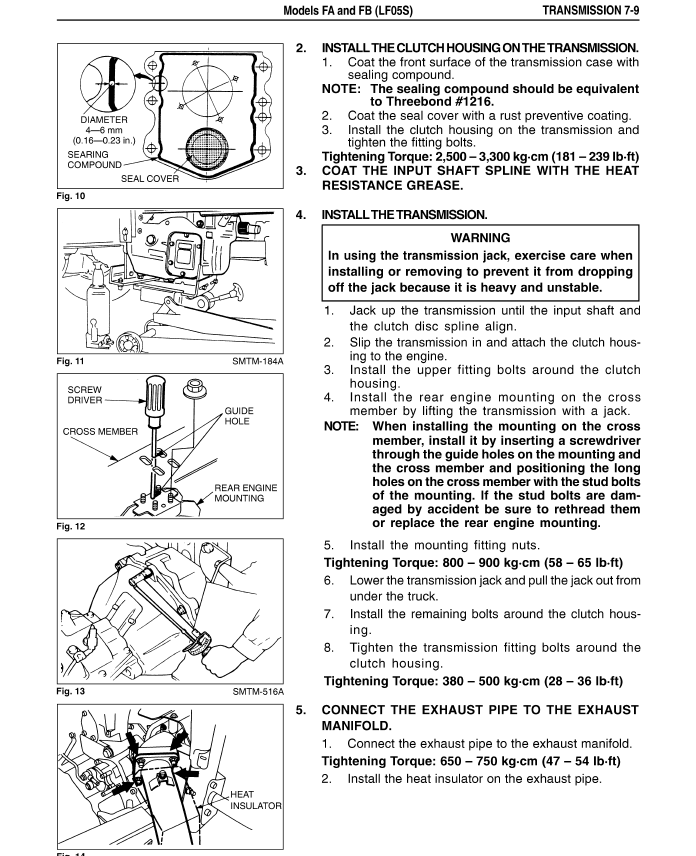
ASSEMBLY
NOTE: Prior to assembly, be sure to apply engine oil to each sliding part and replace the O-rings and gaskets with new ones.
1. ASSEMBLE THE INLET VALVE.
1. Assemble the gasket, valve seat, inlet valve and valve spring in that order from the lower side of the cylinder head, then install the valve holder and tighten provisionally.
2. Before completely tightening the valve holder, push in the inlet valve with a finger or bar from the upper side of cylinder head (unloader valve side), and check that the valve and spring moves smoothly.
3. After checking the operation of the valve and spring, tighten the valve holder to the specified torque using a special tool.
Special Tool: Adapter (09481 – 1090) Tightening Torque: 1,000 – 1,200 kg-cm (73 – 86 lb-ft)
4. Check to see that the inlet valve stroke is approximately 2.5 mm (0.098 in.).
5. Caulk three places on the outer periphery of the valve holder.
NOTE: In this case, be sure that the lower face of the valve holder is not protruding from the head lower face. (The faces should be flush or the lower face of the valve holder should be recessed from the head lower face.)
Share