1
/
of
4
Uploader
Kobelco K909-II and K909LC-II Excavator Service Manual Workshop Guide
Kobelco K909-II and K909LC-II Excavator Service Manual Workshop Guide
Regular price
$34.00 USD
Regular price
Sale price
$34.00 USD
Unit price
/
per
Taxes included.
Shipping calculated at checkout.
Couldn't load pickup availability
Manual Included:
Service Manual:
531 Pages
Specifications:
Brand:
Kobelco
Model:
K909-II and K909LC-II
Serial Numbers:
LL-1201- (K909-II)
LQ-1601- (K909LC-II)
Type:
Hydraulic Excavator
Manuals:
Service Manual
Publication Numbers:
S5LQ0003E-02
Language:
English
Format:
PDF
Description
TABLE OF CONTENT: Service manual
SPECIFICATIONS
MAINTENANCE
SYSTEM
DISASSEMBLING
TROUBLESHOOTING
Preface Instructions
Read and understand all Warning plates and decal on the machine before Operating, Maintaining or Repairing this machine. The manual has been written for the repair specialist. The serviceman or mechanic may be unfamiliar with many of the systems on this machine. This makes it important to use this manual and be caution when performing service work.
Please go carefully through the Shop Manual of the Excavator before starting any repair work. Use proper lifting procedures when removing any components. Be careful when removing filler caps, breathers and plugs on the machine. Hold a rag over the cap or plug to prevent being sprayed or splashed by liquids under pressure. The danger is even greater if the machine has just been stopped because fluids can be hot.
Use the Shop/Service Manual of the K909-II and K909LC-II Excavator as a reference book and source of information even if you are familiar with Excavator technology. Using the Workshop Manual, the experience construction machine mechanic can carry out any necessary repairs expertly.
DISASSEMBLY AND ASSEMBLY
GENERAL PRECAUTIONS
1) All the hydraulic components are precision machined. Therefore, a particularly clean place must be selected in performing disassembly and assembly.
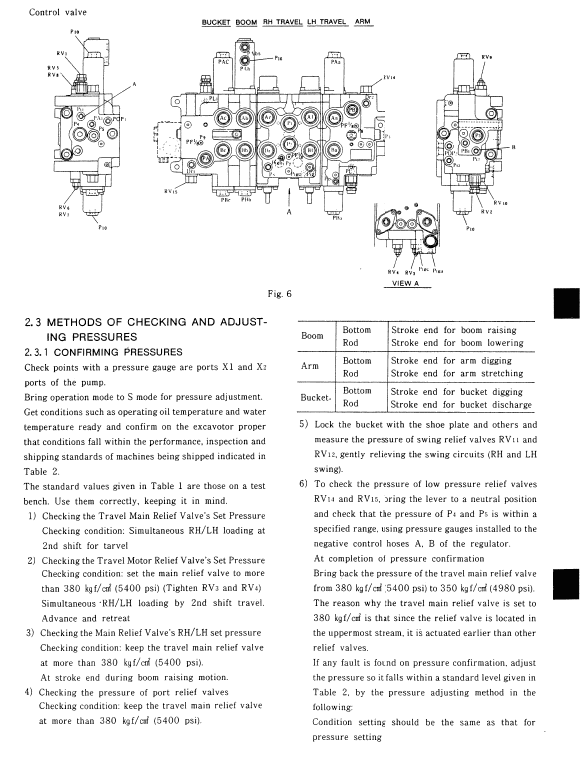
2) When handling the control valve, exercise full care so as not to allow dirt, sand and soil to intrude in its interior.
3) When dismantling the control valve from the machine, apply a cap to each port. Reconfirm before disassembly that all ports are capped, and wash the outside of the assembly. Use a suitable work bench and lay a clean paper or a rubber mat over the work bench.
4) When transferring or moving the control valve, always bear the body section, and do not support the lever, the exposed spool area or the end cover, exercising sufficient care.
5) After disassembly and assembly of components, various tests (relief characteristic inspection, leak test, overload valve setting, and flow resistance) should preferably be performed, but these tests require a hydraulic testing apparatus. For this reason, do not disassemble such components that may be dismantled technically but may not be tested and adjusted. Furthermore, get clean cleaning oil, hydraulic oil and grease ready beforehand.
Share


